When it comes to upgrading your home, choosing vinyl siding is a smart choice for many reasons. As one of the most common materials, it’s not only low-maintenance and cost-effective but also highly durable, making it a favorite among homeowners. There are various types available, and if you’re considering installing it yourself, it’s a chance to save money on what could otherwise be an expensive project.
The process, however, requires some patience and basic carpentry experience to get it right. Whether it’s your first time siding a house or you’re ready to tackle a larger project, having a clear primer and plan before you dive in can make all the difference. Taking the DIY route might seem intimidating, but with the right material, tools, and preparation, it can be a rewarding experience.
Materials Needed for Siding
- Vinyl siding
- 12-foot panels
- Trim material (for corners and areas around windows and doors)
- Fasteners
- Nails made of galvanized steel or aluminum (corrosion resistant)
- Hammer
- Laser level
- Tape measure
- Zip tool (to remove siding)
- Angle grinder

Vinyl Siding Installation: Things You Should Know
When it comes to vinyl siding installation, the advice from Constantine Anest of Ethos Roofing & Restoration is invaluable. He recommends you start from scratch by taking off all the existing siding, even if it’s in decent shape, to ensure a proper foundation.
This means you’ll need to remove all siding down to the layer of sheathing and then wrap the exterior in a protective house wrap. Adding a layer of foam provides extra insulation before you begin to install vinyl siding. Following this approach ensures your project has a solid base for lasting results.
The whole process of installing siding can be much easier if you enlist a friend or two to help. Even for those confident in DIY home improvement projects, having a work buddy makes things run smoother, especially when standing on ladders and handling lengthy and unwieldy pieces of siding. An extra set of hands can prevent mistakes and ensure nothing goes wrong during the installation process.
It’s also crucial to aim for an aesthetically pleasing result, which means you’ll need to hide the siding seams effectively. One excellent way is to begin at the back of the house and work towards the street, ensuring the seams are hidden from view, enhancing the curb appeal of your property.
A crucial rule for success is to measure twice before you cut. As Anest emphasizes, this step prevents waste of siding materials and avoids errors like cutting to the wrong lengths. Take your time, and always double-check your measurements to make sure your overlap at every joint is seamless. Using the factory edge for a proper overlap is key to durability and a polished appearance.
How to Nail Vinyl Siding Properly
When installing vinyl siding, it’s crucial to work systematically and pay attention to details. Start by positioning each nail in the middle of the slot on the panel and gradually move toward the ends. This approach helps ensure that the nails are evenly spaced and at the same level. According to Ralph Severson, owner of Flooring Masters and Professional Remodelers, you should never drive the nail head too tight against the siding.
Instead, he recommends leaving a 1/32-inch gap between the head of the nail and the siding. This allows the siding to have enough space to expand and contract, preventing potential warping or damage. Keep the nails slightly loose to allow the panel to shift naturally as temperatures change.
Effective Method for Cutting Vinyl Siding
When it comes to cutting vinyl siding, following a rule of thumb ensures precision and durability. As Anest explains, you’ll often need to cut the siding short to fit a corner properly, keeping in mind temperature changes that can cause it to expand in the summer heat. To avoid issues like buckling, leave an allowance of at least 1/4-inch along the edges, allowing the panels to slide back and forth as needed.
Use a 12-inch square to mark your cuts for accuracy, ensuring a straight line. For the actual cutting, an angle grinder works well, handling the material with ease and precision. By accounting for these factors and proper measurements, you’ll create a professional and secure installation every time.
Step-by-Step Guide: How to Install Vinyl Siding
Installing vinyl siding is an efficient way to upgrade the appearance of your house while ensuring durability. Here’s a detailed guide based on my expertise, using clear and actionable steps.
Preparing for the Installation
Before you begin installing vinyl siding, it’s crucial to remove any old material from your house. This step is especially important for an older home, as you might uncover multiple layers beneath the surface. Use a zip tool to carefully unhook the current panels, ensuring you leave a clean foundation. This allows the new siding to sit properly and securely.
Setting the Foundation
With a clean slate, the next step is to attach sheathing. Ensure the sheathing provides a smooth surface by avoiding direct attachment to studs. Depending on your needs, you can choose foam plastic, plywood, or OSB for insulation. Don’t forget to add a water-resistant barrier to protect against moisture. Pay attention to flashing around corner posts, doors, and windows to prevent leaks.
Aligning the Starter Strip
Installing the starter strip correctly is the backbone of the process. Use a laser to snap a straight line around your house. This ensures your starter strip is perfectly level. Nail it securely to the bottom wall, ensuring the siding attaches smoothly. Avoid any wonky installation by double-checking the alignment at every step, as even a minor misstep can derail the entire project.
Focusing on Corners
For inside corners, place the trim pieces carefully where the walls meet. Extend them slightly beyond the bottom, and hold them steady as you nail each side, maintaining consistent spacing of about 12 inches. For outside corners, follow a similar process, ensuring the trim is securely in place and the nails are evenly spaced.
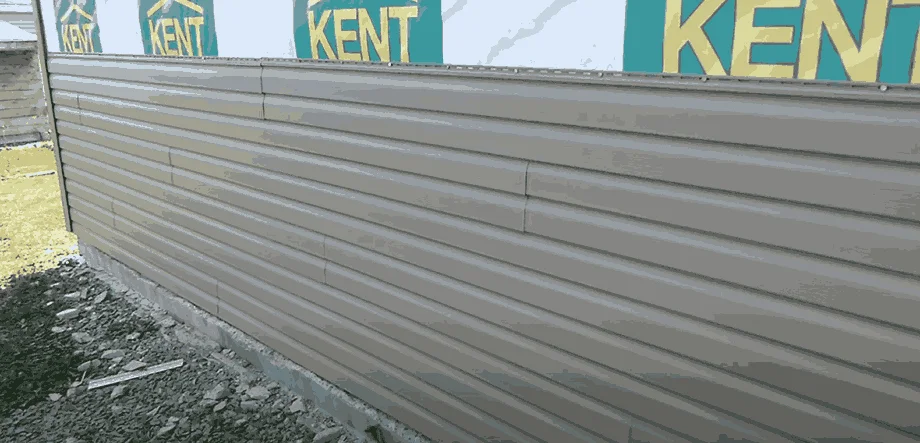
Adding the Vinyl Panels
Start with the first panel, cutting it short if necessary to allow for expanding and contracting during summer and winter. Leave a small gap between the nail head and the wall to accommodate natural movement. Each panel must clip securely to the one below it. If not properly clipped, you may need to uninstall and start over. Work methodically from top to bottom, ensuring every piece is aligned correctly.
Finishing Touches with J-Trim
Finally, install the J-trim, also known as the J-channel, around doors and windows. Measure and mark the trim before cutting it to fit. For the sides, hold the trim in place and secure it with nails, spaced about 12 inches apart. On the top, make a 3/4-inch cut on each end to ensure it fits seamlessly. This step not only enhances the look but also protects against unexpected repairs.
By following these steps with care and precision, your vinyl siding installation will look professional and provide long-lasting results.
Conclusion
Installing vinyl siding is a practical and cost-effective way to enhance the durability and appearance of your house. By following the step-by-step process, including proper preparation, securing the starter strip, and aligning panels, you can achieve professional-grade results. Paying attention to details like inside corners, outside corners, and the J-trim ensures a seamless finish that protects against the elements.
With the right tools, such as a zip tool and laser level, and careful planning, this project can be both efficient and rewarding. Whether you’re upgrading an older home or adding a fresh touch, vinyl siding offers long-lasting value. Remember, thorough preparation and precision are key to a successful installation.